
Heads Up LCD Displays for Hauptwerk
2015-09-21 - Cool GearThis week, MIDIWorks (A.K.A. OrganWorks), is releasing their colour Hauptwerk LCD Heads Up Displays. Many are used to the 2-line 16 character screens, from MIDIBoutique, that have been the standard in the Hauptwerk world for some time. MIDIWorks is hoping to change that and become the new standard.
Overview
Ostensibly, they're designed for people who are refurbishing consoles where they do not plan to use touch screens or for users who want this kind of heads up data available in front of them instead of off to the side on a touch screen. It's also for anyone who likes having colour shoe indicators for sure.
The screens come in 2 sizes; a 3.2" screen and a 4.3" screen. (exact installation sizes are included on each product page)
There are 5 distinct screen views available on each screen. You can change between screen views by touching the right (forward) and left (backwards) sides of the screen. If you happen to need more than one view at a time, you can daisy chain the screens. Each screen boots up to show the last screen it was on before it was powered off.
Unlike the MIDIBoutique screens, these are not programmable using Hauptwerk's "MIDI LCD Panel Control for this organ" screen. All of that data is available on the MIDIWorks screens, it's just that you do not get to choose where it's displayed.
What's Included?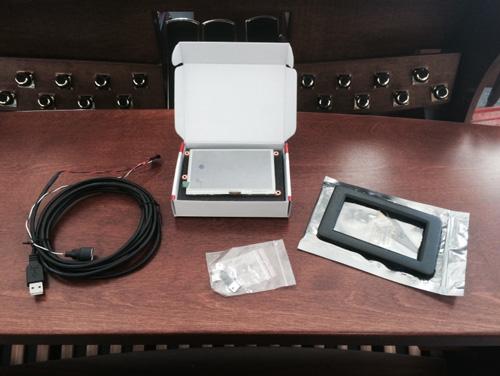
In the kit, there is the screen, a black bezel (frame) for around the screen (installed in this pic), a mini-SD memory card (already installed) and a connector cable with a regular 5-pin MIDI jack and a USB connection.
Hooking It Up
Hauptwerk communicates with the screen via the 5-pin MIDI jack part of the connector cable. Connect that to the MIDI OUT port of your MIDI interface. The USB part of the cable plugs into the computer's USB port in order to power the the screen. If you happen to be out of powered USB ports on your computer, you can use a USB power adapter like you have for your phone's charge cable.
Configuring
Most of the configuring is done in one step through the General Settings > General Preferences > MIDI console status output. All you do is set the output port and you're mostly done.
The shoe indicators, allow you to have a bit more control. You set those up individually in each shoe's output screen. While it's not a one-step setup, the good part about this is that if your sample set doesn't have 4 shoes or a crescendo on it, you could map other things to one of the indicators. I'm thinking primarily that you could map the overall volume of your Hauptwerk setup or the Trim Fader to an unused shoe indicators. So, that's a bonus.
Here is the full configuration tutorial if you want to check into that.
The Screen Layouts (images taken from the "getting to know your LCD screens" tutorial)
Screen 1
Screen 2
Screen 3
Screen 4
Screen 5 and 6 are primarily for theatre organ users. Screen 5 is a modified version of screen 1. The only difference is that the names of the shoe indicators are representative of theatre organ shoes.
Screen 6 is an exact duplicate of screen 2 so that, if you're moving between (presumably important) screens in a hurry, you just click one screen ahead instead of 3 back.
Pricing and Availability
The 3.2" screen retails for $269 USD while the 4.3" screen retails for $399 USD. They are on sale now at www.midiworks.ca in the Display Screens section
Comments
Also the touch required to go forward or back is much more a definite press.
It would be nice if the Screen Number was shown in the upper left, as I believe there's some space not used there.
Screen 2 indicates, '"Set" flashes when Set is Pressed', but I'm not getting any flashing. When I read the description, I was very excited because it's all too easy to forget that Set is on and the flashing would make it easy to see that it is or isn't.
As far as the touch goes, did you take off the plastic film that protects the screen prior to install? That helps.
I just checked the "set" button again. You see the "set" indicator come up on screen 2 or 6. However, it acts just like it does on the computer screen. It "flashes" on to show that it's on but doesn't flash in the sense of blinking. I apologize if that's misleading.
Is there any way the "Set" indicator could be made to be flashing (quickly cycling between on & off) when active? This would be a real bonus.
It would be nice to have photos of the back of the units also. It's not clear how you would be able to daisy chain multiple units together.
The only real difference between the real screens and the mock ups are that the characters aren't quite as super smooth on screen as opposed to the mock ups.
Daisy chaining them requires an extender cable that just continues pins 1, 3 and 4 on to the next screen.
I'm guessing it is only for switching between views since MIDI output is input to the displays. Again, it just isn't clear.